Canvas Coach Tolulope runs through her top three reasons why she loves Canvas Studio.
Canvas – which replaces VITAL as our virtual learning environment after 31 July – comes with a bunch of great new features, including one that I am most excited about, Canvas Studio.
Canvas Studio has an array of useful features for creating, editing and sharing video content. It’s important to know exactly what’s on offer so that you can make the most of this great tool. So here are my top 3 favourite Studio features:
- It’s brilliant for creating and editing content
- Display: You can create video recordings using screen capture while simultaneously filming yourself on webcam
- Captions: You can automatically generate captions for your videos and these can be added in multiple languages. The captions are also editable via the caption editor function – useful right?
- It’s really easy to use
- Upload: Simply drag and drop video files from your computer or paste a link directly from YouTube to add video content
- Live commenting: You can make time-stamped, in-video comments which can be seen by other students and lecturers as they watch. This is a handy way to raise queries or start a discussion
- Compatibility: Canvas Studio works equally well on mobile devices for both creating and viewing content
- You can share your videos within and outside Canvas
- Sharing content: Files can be shared directly in Canvas or externally via a link using the messaging function. You can also generate an embed code to share videos on webpages
- Built-in content management: You can save and organise your audio files and videos in folders, making it easy to access all your media files within your new VLE
Watch: How to create, edit and share video content in Canvas
Watch this video by Canvas Coach Joe to find out how you can do all of the above, plus much more, in Canvas.
Getting started
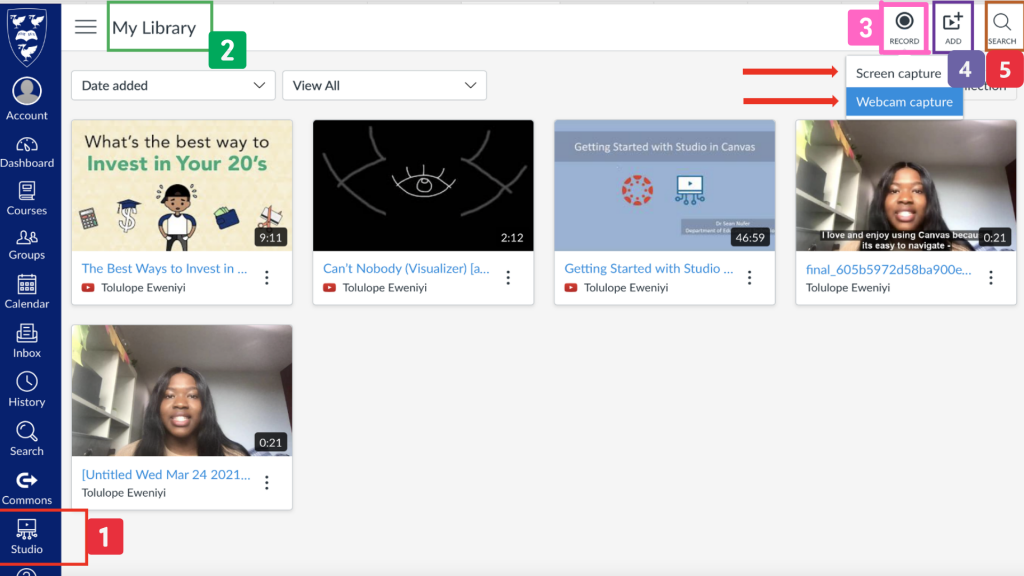
The quickest way to access Studio is through the Studio icon (1) on the left-hand side navigation bar in Canvas.
Within the Studio interface, there is a toolbar at the top of the page, which includes the following key options:
- My library (2): shows all the media you’ve uploaded to Studio
- Record media (3): this is where you can begin to create videos
- Add media (4): you can easily drag and drop video files from your laptop or paste a link from YouTube in Studio
- Search media (5): use this to search for a video or audio files, by simply entering the name or subject of the video or audio file you are looking for

Click here for a step by step guide on how to create content in Canvas Studio
Need a bit more help?
First take a look at the Canvas Studio Online guide or alternatively, contact the Canvas Support (Tier 1) team, available 24/7, 356-days-a-year via live chat, email or phone. Click the ‘help’ button on the left-hand side navigation bar in Canvas to contact the team.
For more information on how to access support in Canvas, click here
Don’t forget – the last day you will be able to use VITAL will be 31 July – after this date all your modules will be in Canvas. Before this deadline, make sure to check if you want to download and save any of the materials – such as Turnitin assignments, feedback and discussion boards – which can’t be copied over into Canvas for you. Full details on what you need to do are available on the Canvas student site.